
This practical VBA exercise explains one small technique at a time. Work in a copy of your workbook, use Alt + F11 to open the Visual Basic Editor, and test the macro on a small sample before running it on live data.
In this article
Before you run the code
- Save a macro-enabled copy of the workbook (.xlsm).
- Use Option Explicit in a standard module to catch misspelled variable names.
- Read the comments and adjust sheet names, ranges and examples to fit your own file.
What this exercise covers
You can use a RefEdit control in Excel VBA to get a range from a user. The Userform we are going to create colors the minimum value of the range stored in the RefEdit control.
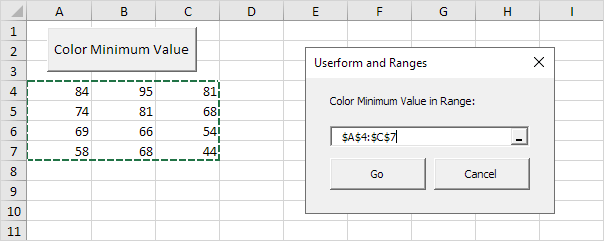
To create this Userform, execute the following steps.
1. Open the Visual Basic Editor. If the Project Explorer is not visible, click View, Project Explorer.
2. Click Insert, Userform. If the Toolbox does not appear automatically, click View, Toolbox. Your screen should be set up as below.
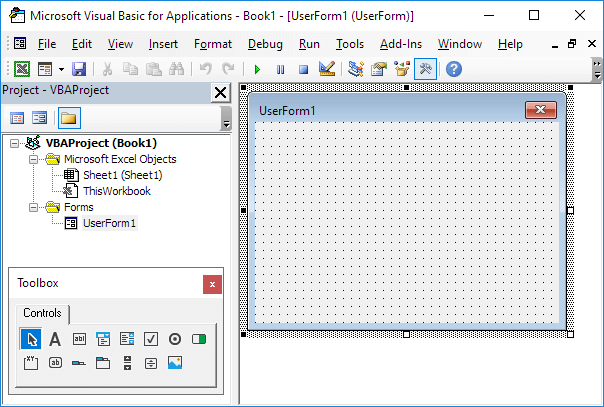
3. Add the label, RefEdit control and command buttons. Once this has been completed, the result should be consistent with the picture of the Userform shown earlier. For example, create a RefEdit control by clicking on RefEdit from the Toolbox. Next, you can drag a RefEdit control on the Userform.
If your toolbox does not have a RefEdit control, set a reference to RefEdit control. Click Tools, References, and check Ref Edit Control.
4. You can change the names and the captions of the controls. Names are used in the Excel VBA code. Captions are those that appear on your screen. It is good practice to change the names of the controls, but it is not necessary here because we only have a few controls in this example. To change the caption of the Userform, label and command buttons, click View, Properties Window and click on each control.
5. To show the Userform, place a command button on your worksheet and add the following code line:
Private Sub CommandButton1_Click()
UserForm1.Show
End Sub
We are now going to create the Sub UserForm_Initialize. When you use the Show method for the Userform, this sub will automatically be executed.
6. Open the Visual Basic Editor.
7. In the Project Explorer, right click on UserForm1 and then click View Code.
8. Choose Userform from the left drop-down list. Choose Initialize from the right drop-down list.
9. Add the following code lines:
Private Sub UserForm_Initialize()
Sheet1.Cells.Font.Color = vbBlack
UserForm1.RefEdit1.Text = Selection.Address
End Sub
The first code line changes the font color of all the cells on sheet1 to black. The second code line obtains the address of the current selection and displays it in the RefEdit control.
We have now created the first part of the Userform. Although it looks neat already, nothing will happen yet when we click the command buttons on the Userform.
10. In the Project Explorer, double click on UserForm1.
11. Double click on the Go button.
12. Add the following code lines:
Private Sub CommandButton1_Click()
Dim addr As String, rng, cell As Range, minimum As Double
addr = RefEdit1.Value
Set rng = Range(addr)
minimum = WorksheetFunction.Min(rng)
For Each cell In rng
If cell.Value = minimum Then cell.Font.Color = vbRed
Next cell
End Sub
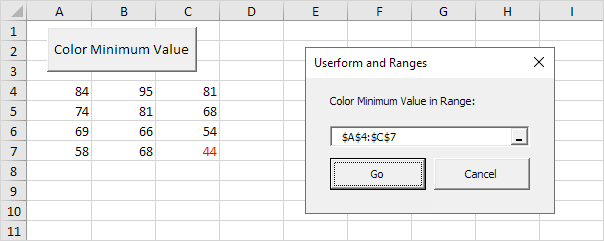
First, we get the address from the RefEdit control and store it into the String variable addr. Next, we set rng to the range specified in the RefEdit control. Next, we use the worksheet function Min to find the minimum value in the range. Finally, we color the minimum value(s) using a loop.
13. Double click on the Cancel button.
14. Add the following code line:
Private Sub CommandButton2_Click()
Unload Me
End Sub
This code line closes the Userform when you click on the Cancel button.
15. Test the Userform.
Result:
Test, adapt and continue
Run this example on a few known cells first and compare the result with a manual check. Once it works, replace hard-coded references with named ranges or clear input cells so the macro is safer to reuse.
This post is part of the Excel VBA learning series. For formula-led alternatives and related spreadsheet techniques, see our Excel guides.
Test formulas dynamically in our web formula laboratory or download the companion Excel workbook.
Stuck on a step? Ask a question and the AI answers using this article.