Font
The Font property of the Range object in VBA gives access to a lot of other properties. That is because the Font property returns an object itself; the Font object. The Font object has many properties like the Color property and the Bold property.
In this article
Color property
To change the color of an Excel range, use the Font property of the Range object, and then the Color property of the Font object.
1. Add the following code line:
Range(“A1”).Font.Color = -16776961
Where do we get this strange number from? Well, we started the Macro Recorder and changed the color of a cell to red. You can to this for every color!
2. The following code line gives the exact same result.
Range(“A1”).Font.Color = vbRed
vbRed is a sort of built-in constant in Excel VBA. Place your cursor on vbRed in the Visual Basic Editor and click F1 to see which other constants you can use.
3. The following code line gives the exact same result.
Range(“A1”).Font.Color = RGB(255, 0, 0)
RGB stands for Red, Green and Blue. These are the three primary colors. Each component can take on a value from 0 to 255. With this function you can make every color. RGB(255,0,0) gives the pure Red color.
Bold property
The following code line bolds a range:
Range(“A1”).Font.Bold = True
To unbold a range, you can use the False keyword. The Font object has many more properties. If you want to program these sort of things, just use the Macro Recorder to see how to do it! Usually code created by the Macro Recorder is too long. For example, the Macro Recorder creates the following code when we bold Range(“A1”).
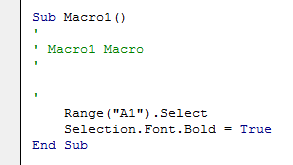
We have just seen that these two code lines can be written as one code line.
Practical VBA workshop
Goal: build a readable report header and apply consistent number formats without selecting cells.
A monthly report arrives as plain values. The title, headers, dates and amounts must look consistent before the workbook is shared.
What you will build
- A complete procedure that works without Select or Activate.
- Test data and expected behaviour you can verify before using real files.
- Error cases and production checks that prevent silent damage.
Complete VBA example
Option Explicit
Public Sub FormatReportPart1()
    Dim ws As Worksheet, lastRow As Long
    Set ws = ThisWorkbook.Worksheets("Report")
    lastRow = ws.Cells(ws.Rows.Count, "A").End(xlUp).Row
    With ws.Range("A1:D1")
        .Merge
        .Value = "Monthly Sales Report"
        .Font.Name = "Aptos Display"
        .Font.Size = 16
        .Font.Bold = True
        .HorizontalAlignment = xlCenter
    End With
    With ws.Range("A2:D2")
        .Font.Bold = True
        .Borders(xlEdgeBottom).Weight = xlMedium
    End With
    ws.Range("A3:A" & lastRow).NumberFormat = "dd-mmm-yyyy"
    ws.Range("C3:D" & lastRow).NumberFormat = "₹#,##0.00;[Red]-₹#,##0.00"
    ws.Columns("A:D").AutoFit
End Sub
How the solution works
- Qualify every Range through a worksheet variable so the active sheet cannot receive accidental formatting.
- NumberFormat changes presentation, not the stored value; calculations continue to use the underlying number.
- A single With block avoids repeated object lookups and makes the intended range obvious.
Run it step by step
- Download and unzip the practice pack below. Open the matching CSV or copy it into a new macro-enabled workbook.
- Press Alt + F11, choose File → Import File, and import this chapter’s
.basmodule. - Rename the sample worksheet to the name used in the code, or change the worksheet name in one clearly marked line.
- Run the procedure with F5. Compare the result with the expected values and boundary cases in the CSV.
- Undo is not available after a macro changes a workbook. Test on a copy, save only after checking totals, and keep the original source file.
Common mistakes
- Using Selection or ActiveCell makes the macro depend on where the user clicked.
- Merging data rows breaks sorting; merge only a title area when it is genuinely needed.
- Applying formatting to whole columns can enlarge the used range and workbook size.
Make it production-ready
Add Option Explicit, qualify every workbook and worksheet, validate the last row and input types, and use a single cleanup section to restore ScreenUpdating, EnableEvents and calculation settings after an error. Avoid hard-coded regulatory rates or colour-only business rules. Record the source, effective date and assumptions in a visible Notes sheet.
Practice challenge
Add a fifth column named Variance and display positive amounts in green, negative amounts in red, and zero as a dash.
Test normal data, blanks, text in numeric columns, duplicate values and the exact threshold boundaries. A useful macro should fail clearly rather than produce a plausible but wrong answer.
Download the practice pack
Download VBA Chapters 13–23 practice pack (.zip)
The pack contains an importable VBA module and UTF-8 CSV test data for every chapter. Review code before enabling macros.
Test formulas dynamically in our web formula laboratory or download the companion Excel workbook.
Stuck on a step? Ask a question and the AI answers using this article.